![]()
FAQ
LAST UPDATED ON OCTOBER 1ST 2021.
This FAQ is a work in progress and will be updated continuously.
Supported Audio:
By default the ME supports digital audio over HDMI and analogue audio over a 3.5mm TRS jack. HDMI audio offers better quality, so
that's why you should use a video DAC with integrated audio output when connecting to a CRT. If you're connecting to a digital display
without any audio support (like the 8" LCDs shown on some of the snapshots here), it makes sense to buy a cheap audio de-embedder (Amazon
offers these in their "basic" line of products) to still get audio from the HDMI output.
Supported ROM files:
Out of the box ME supports rom files for Master System, Mega Drive/Genesis, NES, Neo Geo, PC Engine and SuperGrafx. Disc images are fully supported
for Mega/Sega CD and PC Engine/Turbo Grafx/Turbo Duo. Limited support is available for Playstation disc images (in general 2D titles are fully supported,
but 3D titles might have performance problems). Support for MANY other systems can easily be added, but that's up to you or other users. Compatibility with rom files and disc images for the supported systems is near 100%. Neo Geo roms are expected to be taken from the FBA Neo romset (available on archive.org).
Adding roms and disc images (step-by-step):
There are two easy ways to add more roms and disc images to your Mega Engine system: the automated rom
transfer service and the manual method using the File Manager.
To make use of the automated rom transfer service, take an USB stick and format it to FAT32 file system
on your PC or MAC. On it create an empty folder called "retropie".
Then start the Mega Engine system and let it boot, insert the FAT32 formatted USB stick and let the system sit idle for
about a minute. This will fill the existing retropie folder with a folder structure providing seperate folders for
each supported system.
You can now remove
the USB stick again, take it back over to your PC and add your own rom files to the matching system folders
(e.g. NES rom files in the ../roms/nes/ folder). Once you added your rom files, you can take the
stick back to the Mega Engine system. Insert your USB stick while the system is idling in the
main menu and wait a little. The system will start to transfer your files over to the internal
storage. We recommend to start with only a handful of roms to get a idea of how long the automated
file transfer takes.
If you don't want to use the automated USB tranfer, make sure sure there is no "retropie" folder on
your USB Stick. Copy your roms onto your USB stick and insert the stick into your Mega Engine system.
Start the FILE MANAGER and (in the left window) navigate to /media/usb0 (the number at the end might
be different for you). In the right window navigate to /home/retropie/roms and into the system folder
you want to add roms to. Using "tab" you can swap between the two windows. Using shift and up and down
you can select as many rom files (or folders) at once as you like and by pressing F5 you initate a copy
command from the location on the one side to the location on the other side.
Physical CD compatibility:
ME supports playback of physical PCE and MCD/SCD discs. we have tested a few hundred titles in physical format and compatibility is very good.
On the PC Engine side of things, there's currently a software bug, which prevents a handful of discs (out of 500+ the system offers) from booting.
Affected are discs that have more than two data tracks. Noteworthy titles include Spriggan mkII, Valis III and IV, Macross 2036 and the American DUO pack-in disc
(the one with Gate of Thunder, Bonk and Bomberman). All these titles still run fine, if you create a disc image and add that to your game library on
the system.
If you try to boot one of those affected discs, the system might freeze. In that case, just remove the power, wait 10 seconds and power
the system up again. After that you can eject the disc using the EJECT DISC menu entry.
If you have a lot of discs, you'll certainly run into a few more titles aren't YET working directly from disc. We're currently compiling a list of titles. For any title you might run into, remember that dumping the disc and adding the image to the Mega Engine's system through USB will allow you to play that title just fine. Eventually we're aiming at 100% CD compatibility and we will provide an update
to the system, once we make progress.
While you might run into compatibility issues with some physical discs, compatibility with rom files or disc images for all supported systems is near 100% already, so don't be afraid of adding your own roms or even ripping your discs and adding your own disc images.
How to dump PC Engine CDs on your PC:
On a PC you should use a software tool called TurboRip (free of charge). It's a command line tool, that will create high-quality rips of all your PC Engine discs. TurboRip will create one .cue file per disc and one additional file per CD track. Images created with Turborip will work fine on your Mega Engine system once you transfer the resulting set of files to the /home/retropie/roms/pce-cd folder.
To create dumps of Mega/Sega CD games, please use ImgBurn instead.
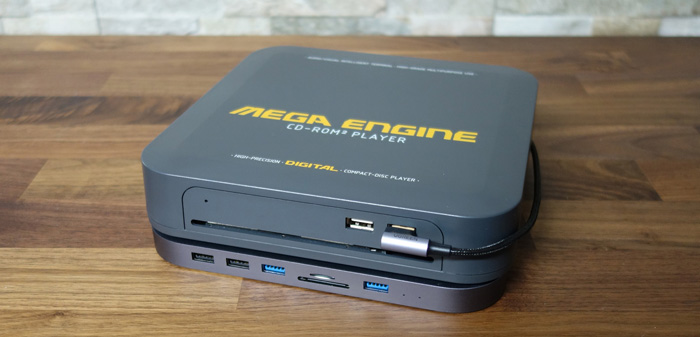
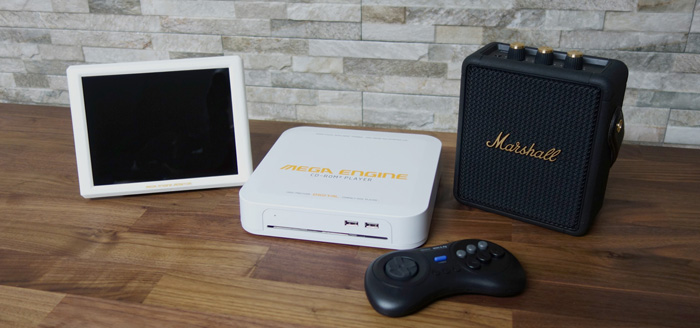
Supported USB accessories:
If you need more USB ports, additional SD card ports or even an SSD enclosure for your extensive rom library, you should have a look at
dedicated Mac Mini accessories. Mega Engine has an almost identical footprint to the Mac Mini and some of the hubs look rather nice, when connected to
the ME. But please watch your power requirements: anything besides a regular USB hub should be connected through a powered USB hub instead of
directly to the ME's USB ports.
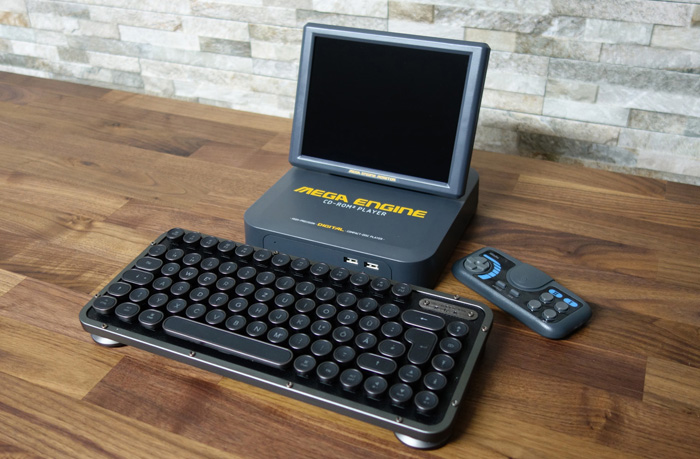
Keyboard support and requirement:
It is by no means necessary to connect a keyboard to your system, but some of the more advanced features definitely profit from it.
This mainly referes to rom management and file transfers using the integrated file manager. It's also handy, if you want to utilize the system for
emulation of other home computer systems (like Amiga), as they profit from both: keyboard AND physical CD playback support. USB and bluetooth keyboards
are supported of course.
Tools required for building the DIY-kits:
You need a PH1 philips screw driver (or bit), a T8 torx screw driver (or bit), a hot glue gun (or any other glue you feel comfortable using)
and a pair of pliers or a hobby knife or a pair of small scissors.
Setting up new controllers:
If you're using a different controller than the one we recommend, you will be asked to set up your controller once it's
first connected. Be careful and pay attention to what's required from you during this setup stage.
The most important part during the controller configuration is to assign a button for your HOTKEY. If you don't assign a hotkey,
but still finish the config process, you can re-initate the controller by pressing START in the main menu and choosing CONFIGURE
INPUT from the menu. If you start a game without having a HOTKEY button assigned, you won't be able to quit the game. If this
happens to you, just pull the power, wait 30 seconds, power the system up again and restart the controller configuration process.
If you really screw up your controller config before finalizing it, you can always just unplug your controller and re-connect it
again to re-iniate the button configuration. Once you finish your controller setup your button assignment is saved to the system,
so if your assignments don't make any sense, you might not be able to reach the main to re-iniate the config process with the
controller you're just using. You can always connect another controller though (one that's unknown to the system) and it will
automatically re-iniate the controller setup. You can initiate the controller config process with any controller - it doesn't have
to be the exact controller you actually want to configure.
If you have a bad configuration and you don't have any additional controllers on hand, you can always connect a keyboard, press
F4 to bring up a terminal and type "rm /home/pi/.emulationstation/es_input.cfg". This will delete your controller configuration.
You can then restart the system by typing "emulationstation" and start fresh from there.
Operating and drive noise levels:
In its basic configuration the system does not require (or utilize) active cooling, so operation when running rom files or disc images is
of course silent. The system uses a 9.5mm slim optical disc drive, which can (and will) exhibit quite some noise when loading or ejecting discs.
Drive speed will always start out on a high default, but will always decrease considerably, once red book audio tracks are accessed and read.
You might find that putting the system on a hard table top tends to amplify noise levels, while setting the system down on a soft fabric ground
(like a mouse mat) will help to attenuate disc loading and ejecting noises considerably.
Warranty and maintaining your ME:
We offer a 90-day guarantee on all parts included. In the unlikely event that any part should be failing you, we will help you
troubleshoot your problem and offer a free replacement part. It will still be up to you though to replace the part in question. Should any part fail
at a later point of time, we'll of course help you source the necessary item. The system does not use any proprietary parts, so all the electronics
can easily be replaced in the long run.
Contact and support:
If you have any questions prior to your purchase or any questions after you got your unit, please contact us using
this email right here. We might add your question to this FAQ or will reply to your directly. Please make sure to read
the included printed manual completely before emailing us. Depending on the number of emails we receive, please note that replies can take a few days.
